Munchkins and Mayhem

Munchkins & Mayhem

A Kids Crafts Blog

Friday, April 13, 2012

Toothfairy Origami Money Heart


Instructables hosts a tutorial for how to create a folded heart out of paper money that houses a quarter inside. Another cute way to fold tooth fairy money.

Get the instructions here:
http://www.instructables.com/id/Dollar-Bill-Oragami-Heart/step8/The-Quarter-Trick/

Tooth Fairy Money Origami Butterfly


Money is extra special when it comes from the Tooth Fairy.  Creative simplicity makes it extra special by folding it into the shape of a butterfly adding a really sparkly pipe cleaner for the antennae.  You could also add some light glitter glue to make the wings sparkle as well.

Get the instructions here:
http://creative-simplicity.blogspot.ca/2012/06/one-of-my-favorite-things-that-i.html

Tooth Fairy Origami Money Box


A wonderful gift from the tooth fairy.  This origami box made from 2 dollar bills contains a tiny note and some coins and even glitter, because after all it came from the tooth fairy. 

The instructions for the box are no longer available on the original site, but can be found on archive.org.   They're reproduced here for stability. 

This box is made from two new crisp bills. Older, softer ones are harder to work with. For this design to work, the folds should be fairly  precise, and perpendicular to the edges of the bill in order to make a rectangle. 


Lay the first bill face up. Fold the bill in thirds lengthwise. Gently unfold these folds, referred to as third folds they will be used later.


Fold the bill top-to-bottom just to the right of the portrait, then unfold. Repeat just to the left of the portrait. These are portrait folds. Note that the third folds oppose (are perpendicular to) the portrait folds.


Starting at the top left corner, close the top third fold to about 90 degrees. Lift the right edge of the bill to the right of the right portrait fold up while holding the top third fold in place, allowing the third fold to close completely to the right of this corner.


 Inside this corner will be a remaining portion that you will crease along the natural 45 degree line to complete the corner.


Complete the previous step for the other three corners. You will have two "tabs" sticking up on the left and right sides.

For each tab, pull it inside the box, folding so that the edge of the box is pulled slightly over inside the fold. For the two other sides, evenly fold over the edge of the bill.

You should now have an open box.


Fold the second bill to make the cover lengthwise so that the width matches the widest portion of the open box just made. You need two width folds


Holding one end of the cover across the bottom of the open box, find the point which matches the corner of the open box and fold at that point.

After folding, open the fold to 90 degrees, hold the cover back in place, and find the point for the next corner of the open box as the cover wraps around. These are wrapping folds  Repeat this process until the cover wraps over itself (four folds). 

There is now one very long side to the cover. Fold back the long side so that is just a bit shorter than the first side.This is called the end cover fold.


The end cover fold puts the remainder of the long side inside the wrapping folds. Refold the wrapping folds holding the long side in place to crease it at the correct points.


 Slide the open box inside the cover before closing the cover tightly, or close the cover with the open box already inside. In either case you are done.


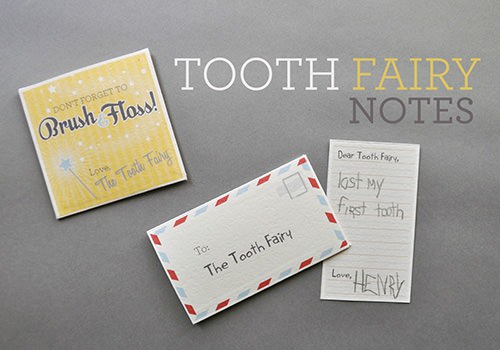
Free Printable Tooth Fairy Letters, Invoice, Certificate and Receipt


Free printable certificates has an adorable certificate from the tooth fairy. Although not a craft, it is an adorable way to commemorate and personalize a visit from the tooth fairy.

Get the pdf template here:
http://www.freeprintablecertificates.net/showcover/tooth_fairy_certificate_silhouette


How does she has tooth fairy invoice to leave for the tooth fairy. The two could be used in combination for a great memento.  She has a different version for girls and for boys. 

Get the template here:
http://www.howdoesshe.com/free-tooth-fairy-printables


Handmade charlotte has both a to and from version of a tooth fairy note, one for the child to complete and one for the tooth fairy to leave behind.  

Get the template here:
http://www.handmadecharlotte.com/free-printable-tooth-fairy-notes/

Jaded blossom has a cute idea for a tooth fairy receipt here:
http://www.jadedblossom.com/2012/06/release-day-4-tooth-fairy.html 


Behance has a cute receipt idea too:


Get the templates here:
http://www.toothfairyletter.net/


Oh my gluestick share a file to print a whole bunch of tooth fairy receipts at a time.

Get the template here:
http://ohmygluestick.blogspot.com/2012/11/free-tooth-fairy-tooth-receipt-by-oh-my.html

Intermittent blogger has a free template to print a mini tooth fairy letter and envelope.

Get the template here:
http://intermittentblogger.wordpress.com/2012/11/16/with-love-from-the-tooth-fairy/

Tooth fairy letter has a whole bunch of tooth fairy letters and coloring pages and other cute notes form the tooth fairy.

Free sample momma has a tooth fairy letter too:
http://www.freesamplemomma.com/free-tooth-fairy-letter/ 
 

Tooth Fairy Books for Inquisitive Kids

Thursday, April 12, 2012

Decorated Clipboards


An easy kids craft that also makes a great gift.  Let kids dress up a purchased clipboard with washi tape, stickers, paint and more with these great ideas below.  


Apple valley girl has a great idea for a gift or just for fun using scrap booking papers, stickers, ribbons and other materials.

Good for ages 8 and up.

Get the instructions here:
http://applevalleygirl.blogspot.com/2010/10/organizing-for-christmasproject-1-make.html


Let's explore has a version that uses just one piece of scrap book paper, large letter stickers, a felt circle and button (although they are hot glued on) so some other kind of stickers would be a good alternative.  She also suggested tying a pencil onto the clipboard with a pretty ribbon.

Get the instructions here:
http://lets-explore.net/blog/2010/12/mini-clipboard-gifts/ 


Inner child fun uses colorful tissue paper squares and glue.  

Get the instructions here:


All free kids crafts takes magazine photos and makes them a cool collage for their clipboard idea.  

Get the instructions here:


 Michelle wooderson makes a special clip board for teacher appreciation. 

Get the instructions here:


Crafts by Amanda makes football and baseball inspired ones.

Get the instructions here:


Our big earth adds magnets and a pocket.

The website is no longer available.  

Wednesday, April 11, 2012

Cereal Birdfeeder


Here comes the sun has a really easy way to make a bird feeder using a pipe cleaner and cheerios. Your kids will love to see all of the birds this spring and how they helped to feed them.

Good for ages 4 and up.

Get the instructions here:
http://herecomesthesun-kelly.blogspot.com/2011/07/cheerio-birdfeeders.html


Rpl children's room uses pipe cleaners to form the bird feeders into cute hearts.

Get the instructions here:
http://rplchildrensroom.blogspot.de/2012/01/cheerio-heart-bird-feeders.html 


By stephanie lynn makes hers into hearts.

Get the instructions here:
http://www.bystephanielynn.com/2011/06/use-cheerios-to-make-a-cool-hanging-bird-feeder.html


Raising Arizona kids makes a chain of Cheerios for the birds to enjoy.

Get the instructions here:
http://www.raisingarizonakids.com/2015/05/bird-feeder-craft-for-kids/

Tuesday, April 10, 2012

Yarn Vases


An ordinary empty bottle is turned into a cute vase by wrapping yarn around it.


Stylist home has a unique craft idea for making a vase out of yarn, glue and an empty bottle.

Good for ages 9 and up.

Tips:
It was actually fairly difficult to get the yarn to lay next to each her in perfect lines.  Try using a thicker yarn to make this easier.  Also, working from the bottom is a lot easier than starting from the top.  Especially if the bottle has ridges at the rim.


Get the instructions here:
http://www.penelopeandpip.com/2012/01/15/diy-projects-diy-wrapped-bottles/


Momtastic has a very similar project using a wine bottle and jute (brown twine). You could probably use raffia too.

Get the instructions here:
http://www.momtastic.com/diy/172833-diy-jute-wrapped-bottles 


Hands on as we grow shows a more kid appropriate version.

Get the instructions here:
http://handsonaswegrow.com/simple-spring-crafts-for-kids/ 


The thrifty crafter uses fuzzy yarn.

Get the instructions here:
http://www.thethriftycrafter.com/2011/06/03/yarn-wrapped-vases/


Everyday dishes wraps robe around containers.

Get the instructions here:
http://everydaydishes.com/creative-crafts/rope-wrapped-containers/
Related Posts Plugin for WordPress, Blogger...
I would love to have you Follow us on Facebook if you aren't already